Now that I work from home full-time I spend a LOT of time in my home office. But I wasn’t happy with it. I had an old Ikea table (literally a hollow wood top, and four round metal “screw-in” type legs). It was cramped, and messy and there was nowhere to store stuff except ON the desktop since my makeshift desk had no drawers. Needless to say, it was kind of a disaster.

[ad]
I’m not gonna lie….I “cleaned” up a little before taking this pic. Otherwise it would have just looked like a computer floating in a sea of crap.
I knew this cramped desk (4’x2′) was not going to work for my needs. I have two 24″ monitors, I need room to lay out ads and inserts, I need a drawer for pens and scissors and such. Plus, I wanted additional space for crafting. I have a sewing machine that lives in my garage in a Rubbermaid tote because I have no place to use it. Tragic.
So I started Googling desks online. I searched Pinterest, I scoured office supply stores. I checked resellers, Craigslist, boutique shops you name it. In the end there were three problems I kept running into over and over again:
- The desks did not meet my needs.
- The desk was too flimsy-looked like it was made crappily.
- Or, the desk cost a fortune.
In the end, there was one desk that I absolutely LOVED. It was the Pottery Barn Bedford Corner Desk Set. I had seen it before in various home offices such as this one over at Between Naps on the Porch. Absolutely gorgeous. I knew I had to have it so I went over to the Pottery Barn Website and I…holy hell, is that $999? Just for the desk? Oh jeebus that doesn’t count the other additional cabinets? I started doing the math and quickly realized that the way I wanted it was going to cost me anywhere from $2,000-$2,500. Not. Gonna. Happen.
So I closed the page feeling deflated. But after mentioning on Facebook that I was dying to have this desk, someone mentioned to me that there’s a website where you can get FREE plans to build tons of different kinds of furniture. And one of those pieces was this desk.
Get outta town. Really? Free? I gotta see this.
[mid]
Sure enough, there’s a blogger named Ana White who has a whole site filled with free construction plans. (Seriously, she’s amazing. She’s built her whole home and all the furniture in it, and now she and her husband are building a DUPLEX for their mothers. How cool is that??) And get this: They are EASY too. Seriously. My construction experience consists of 7th grade shop class (shout out to Mr. Wimmer) and assembling pre-fab Ikea furniture.
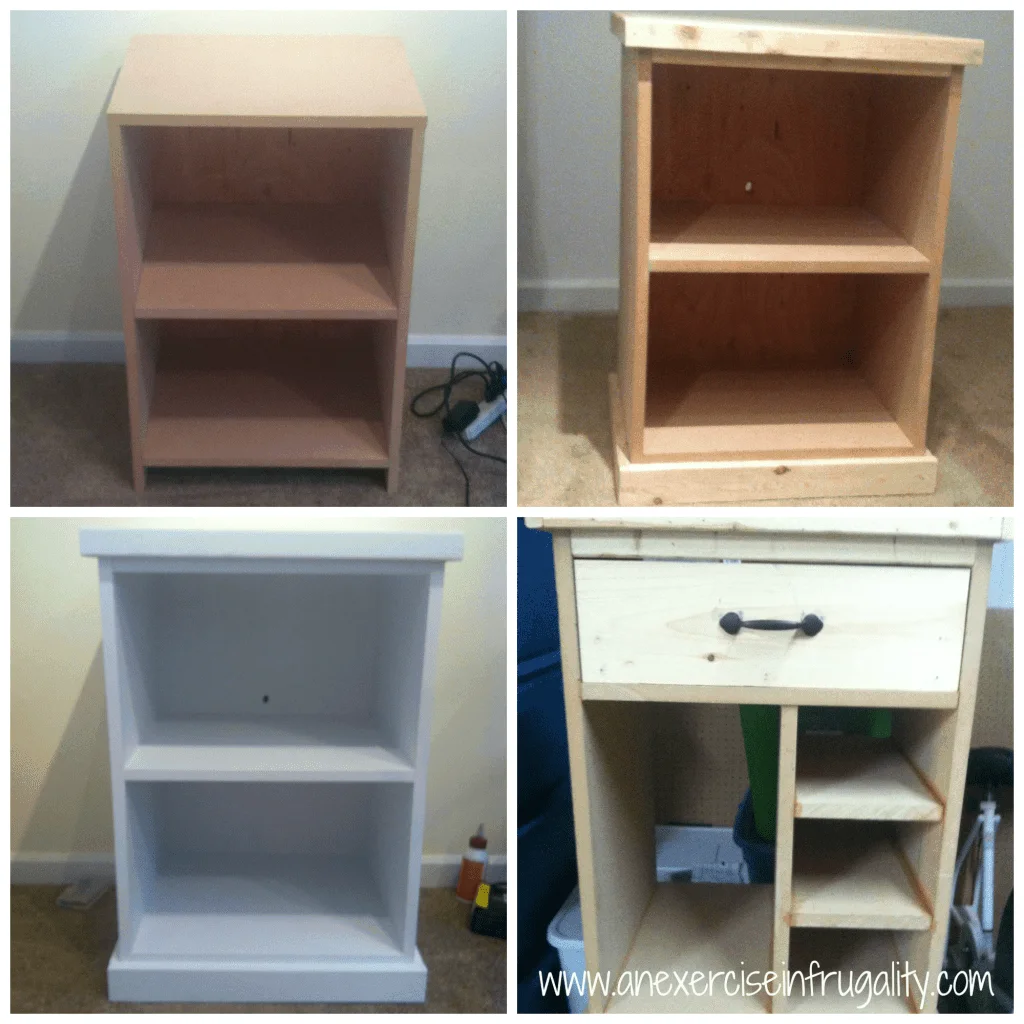
So I downloaded the plans and got busy creating my knockoff Pottery Barn Bedford Desk. Here’s what I have so far. These are the first two of three cabinets. The first cabinet is just an open face cabinet (this will be my printer’s new home, hence the hole in the back). The second cabinet has a drawer, and the bottom left section is where my CPU (aka: computer tower) will live. The third cabinet (not yet pictured) will have two filing cabinet drawers, for both our household personal files, as well as my coupon insert files.

Top left: Cabinet 1 without trim
Top right: Cabinet 1 with trim
Bottom left: Cabinet 1 painted (completed)
Bottom right: Cabinet 2 with trim
Assuming you have basic tools, your cost comes largely from the wood. We spent roughly $180 or so on wood. Plus another $40 for paint, primer and polyurethane. If you have leftover wood or paint, obviously your costs will be cheaper.
I recommend asking the fellas at Lowe’s or Home Depot to cut some of the larger pieces down for you (or they won’t fit in your car) just remember their saw is a rip saw, and it is NOT accurate. So to save yourself a lot of headache and math when they cut ALL your boards short (not like I speak from experience or anything) make sure you give them a 1/2-1 inch larger measurement than you need, and trim it yourself at home.
Here’s the tools you’ll need to complete this project:
Hammer
Nails
Electric Drill
Screwdriver
Drawer Slides (one set of 2 for each drawer)
Kreg Jig (not mandatory but highly recommended
Wood Glue (I used Gorilla wood glue)
Wood Filler
Circular or table saw
Miter Saw
Clamps
Protective eyewear
earplugs
Respirator mask (MDF contains resin, when you’re sawing the dust can be aspirated and can be harmful)
Tape Measure
Square measurer thingy (yes that is the technical name)
Ana White’s site lists all the tools, all the materials and also the dimensions of each cut. She takes all the guesswork out of it (unless your Lowe’s guy cuts your wood too short, then you’re on your own!)
If you’re really ambitious you could finish this whole project within a week including dry time for primer, paint and polyurethane, depending of course on how many cabinets you build. I decided to do three, and extend the desktop out further to leave room for sewing.
Stay tuned for part 2 where I will show you the finished product, and share a little more about the process of building my custom desk!
*I was not in any way compensated for writing this post about Ana White’s plans, nor am I affiliated with Ana White OR Pottery Barn. Just a fan of both. I did receive the building plans for free, but anyone can too!
[Sig]
What do you think? Would you ever build your own desk?
[share]
[disclosure]

Felicia
Tuesday 14th of April 2020
Love this thank you! This is just what I'm looking for because I looked at the price of the bedford desk and said hell no myself!
Lynette Diaz
Sunday 17th of July 2016
Did you ever finish the desk? I can't find part 2.